A grande vantagem dele é que possui diversas opções já em script que abrem muitas possibilidades em cada fala. Além de que ele lê o diálogo de um arquivo de texto, possibilitando troca de falas sem nenhum trabalho de código extra, além de facilitar e muito a localização do texto para diversas línguas e dublagem! Cheque o vídeo de demonstração! Version 1.2: Nota: Toda vez que atualizar um Plugin, salve uma cópia de seu projeto. Nessa atualização de RPGTalk você não deve ter muitos problemas, mas pode perder as referências da variável targetFollow. RPGTalk está disponível de graça na Unity Asset Store, loja especializada de pacotes autorizados pela própria engine Unity3D. Você pode pegá-lo Clicando Aqui! RPGTalk is pretty good, but it has quite room for improvement. Why don’t we make it better together? RPGTalk is opensource and hosted on GitHub. If you have made modifications or snippets for your game, share with the community! Fork it, make a pull request! Let’s create an awesome asset! Apesar de ter várias opções, a implementação do RPGTalk é bem simples. Basicamente, você só precisa de um Arquivo de Texto, um Canvas preparado e o Componente do RPGTalk. Nessa sessão, você vai aprender passo-a-passo com detalhes cada implementação, mas tenha certeza de checar as cenas de demonstração inclusas no pacote. Depois de importado o pacote, basta preparar três passos para que o RPGTalk esteja pronto para uso: 1. Arquivo de Texto Importante: cada linha nova será uma nova caixa de diálogo. Não tenha medo de fazer uma linha grande com tudo que você quer que fique no mesmo diálogo. Por padrão, o RPGTalk quebra o texto em caixas novas com a opção Word Wrap. 2. Canvas Utilizando as próprias funções do Unity para mostrar seus diálogos, RPGTalk usa um Canvas, possibilitando todas as suas configurações, e de início ele só precisa ter um texto. Dentro da cena no Unity, crie um canvas em Game Object > UI > Canvas. Depois, crie um texto em Game Object > UI > Text. Você pode configurar o Canvas e Text da maneira que preferir, só tenha em mente que o texto inicial será substituído pelo arquivo de texto que você criou no passo anterior. 3. Componente RPGTalk O componente que aparecerá no Inspector tem um bocado de opções, mas para para o início rápido, só precisamos focar em três. A primeira opção, pede um arquivo do tipo TextAsset. Coloque lá o arquivo que criamos no passo 1! Pronto! Se tudo está correto, pode apertar Play e ver o diálogo acontecendo! Passe-o clicando na tela! Parabéns, você aprendeu a base do RPGTalk e já consegue criar diálogos! Mas existem várias opções úteis que podem te ajudar! Continue lendo para ver todas! Aqui, você encontrará as opções básicas do RPGTalk que alteram como ele mostra o diálogo na tela. Vamos ver cada uma delas: Start On Awake? Should there be the photo of the talker? A primeira opção, é uma array com todos os objetos que o diálogo pode seguir. Você deve colocar um nome (mesma regra do Should show the name of the talker?) e um Game Object qualquer da cena que será seguido por todos os objetos dentro de “Show With Dialog”. Logo abaixo, você pode dizer se esses objetos devem ser Billboard, e se forem, se devem basear-se na Câmera principal do jogo, ou outra de sua escolha. Essas opções são ótimas para projetos 3D. Enable QuickStep? The first option, Should the canvas follow someone, opens a new option in every character, that you should set a Transform to follow and an offset. The only other thing on this group are Characters. Click the + button to add a character to the list. This list should have the characters that will participate in this conversation (or this whole scene, depending on how you are setting your talks). The first thing it asks of you is Who is this character? This needs to be created on your project. See more down below. Then, you have the Should a different Animator be set for it option. RPGTalk can communicate with an Animator (See more in the Animation group). But if this option is marked, instead of communicating with the Animator set on the Animation group, it will communicate with the animator set here when this character is talking. To use those options, you will need to create a character. This character is stored in your project, and can be reused on several scenes and/or talks. The options here are quite simple. What Photo this character have? If any is set, the UIPhoto on the Interface Options will be this sprite when this character is saying something. Additionally, you can set any number of Expressions to this character. An expression can have a Name, the one it will look for on the TXT (see more in the Tags section). Text UI: Esse parâmetro é obrigatório e deve conter o objeto do tipo Text que o RPGTalk vai escrever. Nessa sessão, você pode mexer em configurações relativas a Script e como o RPGTalk deve agir fora do padrão. CallBack Script: você pode escolher qualquer script (MonoBehaviour) para ser chamado quando o diálogo acabar. Variables: Logo em seguida você pode dar o valor em uma Array representando as variáveis que existem no texto. Para cada item da Array, você abre mais duas opções: Variable Name: O nome da variável, da exata maneira que está escrita no arquivo de texto, para ser substituída. Photos: Você pode escolher uma foto para ser utilizada por cada locutor do diálogo. Nota: esse parâmetro só estará disponível se a opção “Should there be the photo of the talker?” em Opções Regulares estiver marcada. Isso é uma Array que cada item abre mais duas opções: Name: O nome do locutor. Nota: se o nome do locutor for uma variável, coloque como ela é descrita no arquivo de texto. Sprites: You can set here any sprites that can be showed in the text. Note the number of the array element and use it in your TXT to place the sprite in the correct position. For instance, to show the sprite that you created here as the Element 1, in your text, you should write the line like this: For each element created in this array, you have the following options: Sprite: The sprite itself that will be shown i the text. Aqui, você encontrará as opções de animação. São simples mas contemplam o necessário para um diálogo completo. Animator: Coloque aqui um objeto do tipo Animator que deverá tratar das animações. Aqui, você encontrará as opções de Áudio. São apenas duas que criam a ambientação de um diálogo como RPG: Letter Sound: Você pode colocar um arquivo de áudio para tocar enquanto a animação das letras está correndo. O áudio irá parar automaticamente quando a fala chegar ao fim. Nota: Isso não deve ser usado para vozes. Para fazer isso, veja Dubbing. Choice Prefab: Aqui você coloca um prefab para ser instanciado quando uma questão é feita no texto. Esse prefab preferencialmente segue a estrutura base dos botões em Canvas do Unity: Um objeto com o componente Button e um objeto filho com um componente Text. Para fazer a questão e escolhas aparecerem, você precisa criá-las no seu TXT. A questão deve ter um ID para que você possa acompanhar a resposta depois, então use a tag [question=X] quando perguntando algo e nas linhas seguintes comece com a tag [choice] tag. Seu texto deve se parecer com isso: Cada vez que uma resposta é dada, um evento é chamado para que você possa acompanhar isso e mudar o texto de acordo, ou salvar a resposta para algo mais no seu jogo. Cheque Events para ver mais. Cada opção no inspector é pública, então você pode alterá-la por script a qualquer momento. Mas desde a versão 1.2, RPGTalk tem um componente chamado RPGTalk Area que te ajuda a trocar as falas sem escrever nenhum código. Você pode criar um objeto RPGTalk Area indo no menu superior e selecionando RPGTalk > Create RPGTalk Area. Atalho: Ctrl/Cmd + Shift + A. O que RPGTalk Area faz é mudar alguns parâmetros quando colidindo com um trigger. Sinta-se livre para mudar o tamanho do Collider para atender suas necessidades. No primeiro parâmetro, escolha a instância de RPGTalk que você quer mudar. Os próximos parâmetro é sobre quando as coisas devem acontecer. Se marcado como falso, você tem de dizer ao RPGTalk Area quando ele deve começar. Quando o usuário entrar nesse trigger? Ou quando ele sair? Ou os dois? Can only be played once? deve ser marcado se você não quer que essa conversa aconteça de novo se o player interagir com essa Area. A próxima sessão traz opções de Callback , similar em como funcionam na sessão Callbacks, Breaks & Variables. A diferença aqui é que você pode chamar uma função antes que a Area ative. Na próxima sessão você pode colocar um outro TextAsset (TXT) para ser lido e outras linhas para começar ou terminar a conversa, assim como você faria na instância principal do RPGTalk. Note que essas mudanças serão mantidas no RPGTalk mesmo depois que o jogador deixar essa Area. RPGTalk pode facilmente tocar dublagem ou qualquer som junto com o diálogo. É totalmente integrado com o RPGTalk Localization então você pode ter diferentes sons para diferentes línguas também. Para cada elemento criado, você terá uma opção Language (se você não usar o RPGTalk Localization, pode ignorar essa opção) e a array Dub Clip. Tudo que você precisa fazer é colocar nessa array todos os sons que podem ser usados no texto. Note o núemro do elemento de cada um deles. Finalmente, no seu texto, você precisa chamar a dublagem pelo seu ID. Parecido com isso: Note que quando um diálogo é passado, o som de um antigo é parado, mesmo se o novo não tiver dublagem. Assim, quando o jogador pular uma conversa sem esperar o fim do som, ele será cortado. Finalmente, você tem a opção de Usar um Audio Mixer para que você consiga controlar melhor suas opções de som. RPGTalk pode cuidar da localização do seu jogo por você, mas ele não traduz automaticamente seus textos. Você precisa ter uma cópia do seu arquivo (ou arquivos) de texto para cada linguagem. E seu correspondente para o arquivo Cutscene1_Ingles.txt : Com seus textos prontos, você precisa de uma instância do RPGTalk Localization na sua cena. Você pode criar indo no menu superior RPGTalk > Create RPGTalk Localization ou adicionando como um component em qualquer objeto. IMPORTANTE: RPGTalk Localization não é destruído quando a cena descarrega, já que você raramente precisa que ele mude entre cenas. Mas ele funciona iterando todos os seus arquivos de textos, então se seu jogo for muito grande você pode querer destruir ele você mesmo e criar outro para cenas/ocasiões específicas para não arriscar queda de frames toda vez que começar um novo diálogo. Language: Que língua é essa? Escolha de uma lista enum. IMPORTANTE: Todo texto em toda língua deve estar na mesma posição. Se Cutscene1_Portugues é o número 0 na sua lista, Cutscene1_Ingles também deve ser o número zero de sua própria lista. Os últimos parâmetros são simples: Qual é a língua padrão do seu jogo e qual língua ele está atualmente. Note que os textos que você envia para suas instâncias do RPGTalk devem ser na linguagem padrão. Phew! É isso! Se você precisa trocar a linguagem atual durante o gameplay, você pode simplesmente chamar: Note que para chamar você precisa da biblioteca correta no seu código. Por exemplo, um código que troca a linguagem para PT_BR quando o jogo começa seria: Precisa ter uma língua que não está no RPGTalk? Sem problema. Você só precisa trocar o enum no começo do script RPGTalkLocalization. Por exemplo, se você quiser adicionar Chinês no seu jogo, você pode modificar o código para parecer com isso: E todas as línguas vão aparecer em tudo que integra o RPGTalk Localization. Ok, RPGTalk é incrível, mas você não usa ele para t-o-d-o-s os texto do seu jogo, certo? Como o menu principal ou outros itens de interface. Você ainda pode aproveitar do RPGTalk Localization se você usar o Texto padrão da UI. Simplesmente adicione o componente RPGTalk Localization String (Add Component > Seize Studios > RPGTalk > Localization > RPGTalk Localization String) em qualquer objeto que tenha um componente Text e você verá opções similares com as de antes. Uma array que você deve adicionar todas as linguagem que seu jogo terá. Cada elemento traz duas opções: Language: Qual língua a próxima opção é válida para? Timeline é uma função nova do unity incrível para criar cutscenes, e RPGTalk não poderia ficar fora dela. Você pode facilmente integrar os dois simplesmente clicando no botão Add na janela da Timeline e escolhendo RPGTalk Cinematic Track. Você precisa dizer uma instância do RPGTalk na cena para comandar a track. E finalmente, botão direito na track e escolha Add RPGTalk Cinematic Clip. Agora sim! As opções do Clip são em sua maioria simples: O parâmetro mais complexo aqui é o Pause Timeline while waiting for player’s action? Se não for marcado, você só pode ter uma linha por clip. Note que os parâmetros alterados pela timeline voltarão ao que eram antes quando a timeline terminar de tocar ou o clip acabar, ao contrário do que acontece com o RPGTalk Area. Você pode usar várias tags dentro do seu texto para mudar como RPGTalk se comporta com ele. Rich Text: as mais comuns são as tags Rich Text. RPGTalk pode usar completamento Rich Texts mostrando-os sem o usuário perceber. RPGTalk suporta todas as Rich Texts que a UI suporta (quad e material não são suportadas). Veja mais aqui. Sprite: RPGTalk pode colocar imagens dentro do texto. Elas vão agir como se fossem caracteres. Sua UI de texto deve suportar Rich Text e você deve definir quais sprites serão usados na instância do RPGTalk, anotando seu ID. Veja mais em Photos and Sprites. Speed: Você pode trocar a velocidade do texto enquanto ele ainda está rodando para fazer algumas palavras aparecerem mais devagar o mais depressa. Você pode especificar na tag qual é a nova velocidade, em caracteres por segundo, que o texto terá. Você ainda pode fechar a tag [/speed] para voltar à velocidade definida no RPGTalk. Title: Ao invés de definir a linha como um número inteiro no RPGTalk, você pode defini-la como string. Se fizer isso, a instância vai procurar pela tag [title] no seu texto. Ela vai começar a ler a linha depois de um título definido em lineToStart, e vai parar de ler na linha anterior a um título definido em lineToBreak. Veja mais em Regular Options. Dub: Você pode fazer com que um som seja tocado no início de seu diálogo. Você precisa definir os IDs dos sons com o componente RPGTalkDubSounds (veja mais em Dubbing). Quebra de Linha: Nos seus diálogos, pode chegar um momento que você precisar quebrar uma linha, mostrar o resto do texto em uma linha abaixo. Como RPGTalk lê cada linha do txt como um novo diálogo, pode parecer complicado. RPGTalk tem seu código totalmente aberto e pode ser alterado da maneira que preferir. Se você construir algo legal e quiser compartilhar com a comunidade, tenha certeza de nos contar! Public Variables: The There are some useful public methods that can be called when using RPGtalk. These are: New Talk: The possible parameters are: string _lineToStart Play Next: bool forcePlay = false that checks if the the next line should be played even if the enablePass variable is set to false. End Talk: bool jumpQuestions = false if it is false, the talk will jump to any questions found (See choices for more). Some events can be called to improve your interaction with RPGTalk. OnNewTalk OnPlayNext OnEndTalk OnMadeChoice An exemple of how to use these events: [code] void OnMadeChoice(int questionID, int choiceID){ Class used to keep the sounds that will be called by the text. See Dubbing for more. namespace RPGTALK.Dub Public variables: public RPGTalkDubLanguage[] dubsByLanguage; Public methods: public void PlayDubClip(int clipNum) Given its ID, plays a dub clip set in the dubsByLanguage array. public void StopCurrentDub() Stops whatever clip is playing Class that keeps and manage the Localization. namespace RPGTALK.Localization public class LanguageSettings has the following static and public variables: public static SupportedLanguages defaultLanguage = SupportedLanguages.EN_US; Keeps the default language of the game. public static SupportedLanguages actualLanguage What language is the game currently in? public class RPGTalkLocalization Has a variable to keep the language array and another one static, so you can call RPGTalkLocalization wherever you need to. public static RPGTalkLocalization singleton; Methods: public TextAsset CheckForCorrectLanguage(TextAsset baseTxt) Given a base text in the default language, returns the textAsset for the actual language RPGTalkTimeline only needs to be placed in scene when using the timeline feature and waiting for player’s action. See Integrating with Timeline for more. namespace RPGTALK.Timeline Variables: public PlayableDirector timelineDirector the Playable Director that is playing the timeline. public bool isPaused is the timeline currently paused by RPGTalkTimeline? Methods: public void Pause() Pauses the timeline. public void Resume() Resumes the timeline RPGTalk is highly customisable. And this is awesome. You can do a lot of stuff. This Snippet should be placed in the same object as RPGTalk. NOTE: This script uses Characters to know who to follow. Make sure you set it right! SetUps: Camera Specs These options are awesome for 3D projects. Limits Pointer This Snippet have two events, What should happen when the player can pass, What should happen when the player passes. You can then have your own animation, events, etc. This is a very simple Snippet. It should be placed on the RPGTalk Object. It only have one option: Save Between Plays? It has another checkbox, Erase. This is for debug only, and erase everything saved. This Snippet is ready to save Choices and Areas. But if you want to save anything else (like quests), it shouldn’t be hard to make your own script based on it. If you read until here you must already now… RPGTalk is awesome! But sometimes you don’t need all of those options, tags, events, dialogs, not even read a TXT… You only want to animate a simple Text in the canvas. Don’t you worry! With this Snippet on any Text or TextMeshPro element, it will make the text animation with the given Text Speed. You don’t have to be an instance of RPGTalk in your scene to make this Snippet run! The objective is to skip a cutscene set on Timeline. It looks scary, but the options are really simple. The first ones are the same as in RPGTalk, to know what button should be pressed to skip the cutscene. We also have an event that can be fired when we skip. We have a few options too. This snippet needs to be placed inside a Canvas Element. It is a script that makes a balloon pointer using line Renderer. The End Point Variable usually is defined by Follow Character Snippet. But you can control it’s Z or an offset. You can say what is the maximum that this line can stretch. And if it passes the maximum, if it should bend some other way. Simple, but pretty useful when you don’t have control of the exact character position. RPGTalk is already pretty nice, but sometimes you want to build your dialog inside unity, not only on a TXT. We are building something for that. Just go to the RPGTalk Menu > BETA – Node Editor and a window will popup. Click New TXT. Right Click anywhere on the new window, go to RPGTalk > Dialog Node. Feel free to create another and connect the two! Just clic and drag the blue arrows. This way, they will be under the same title, and be part of the same dialog! You can also create a Choice Node. When you connect it to a Dialog Node, an option appears in it showing the ID of the question. There is another node, Save Node. You can use it like it were a Save Tag on your TXT. The conversation changes if something was saved. Don’t forget to Save your TXT before closing the window. 1.Introduction
RPGTalk é um plugin simples para Unity3D que permite a criação de diálogos semelhante aos clássicos do gênero RPG. O texto é mostrado suavemente e é totalmente customizável. 1.1.What's new?
1.2.Download
1.3.Contribute
2.Tutorials
2.1.Quick Start
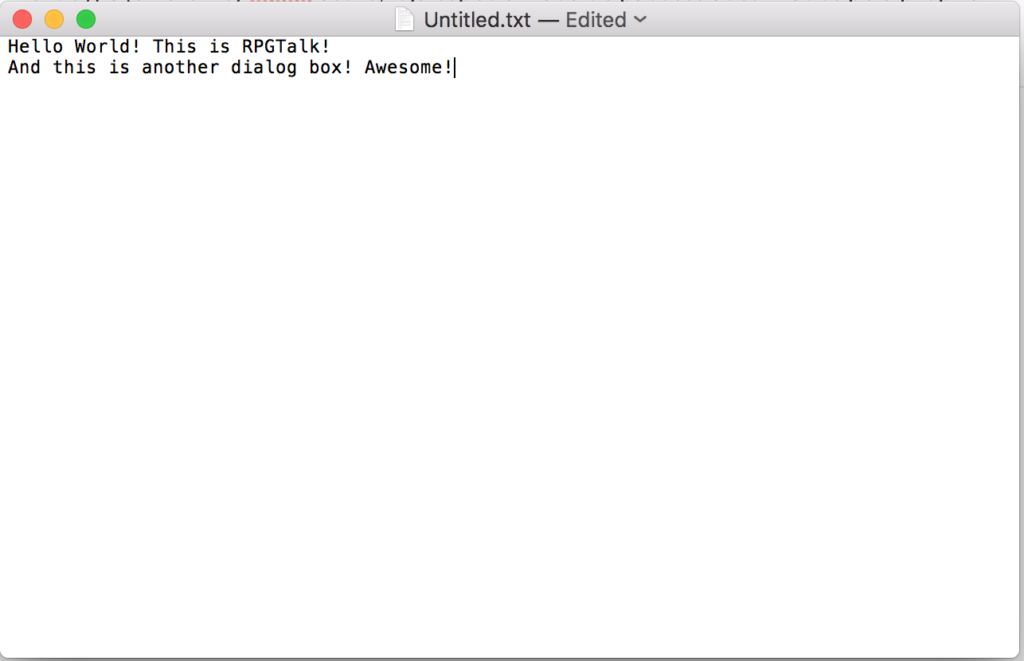
RPGTalk lê os diálogos de um arquivo de texto com a extensão .TXT. Use seu editor de texto favorito (Bloco de Notas, TextEdit, etc) para criar esse tipo de arquivo. Salve-o dentro da pasta Assets do seu projeto no Unity.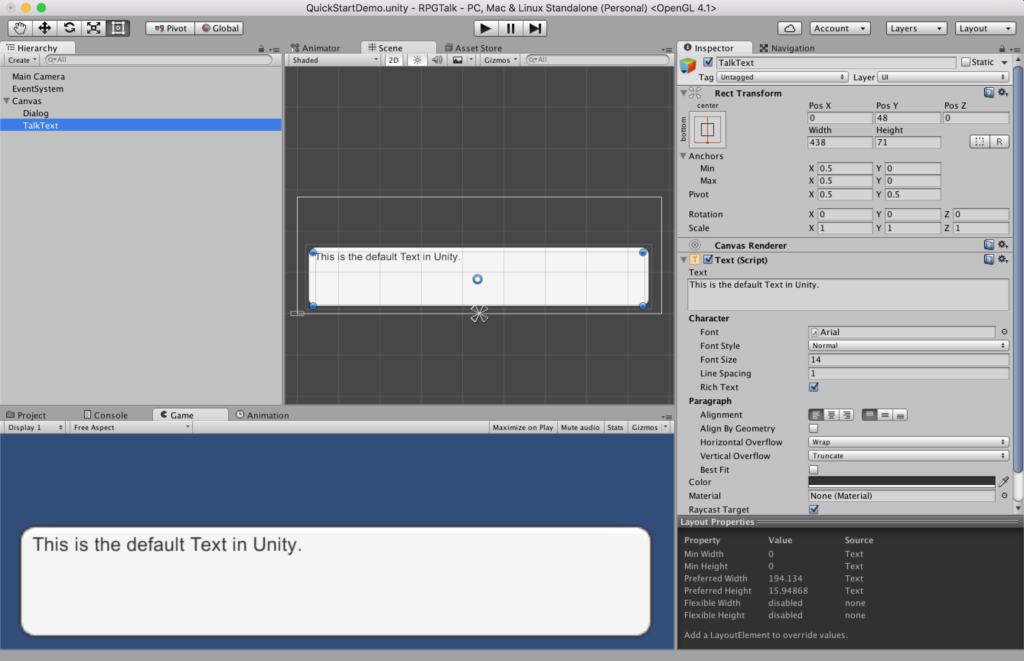
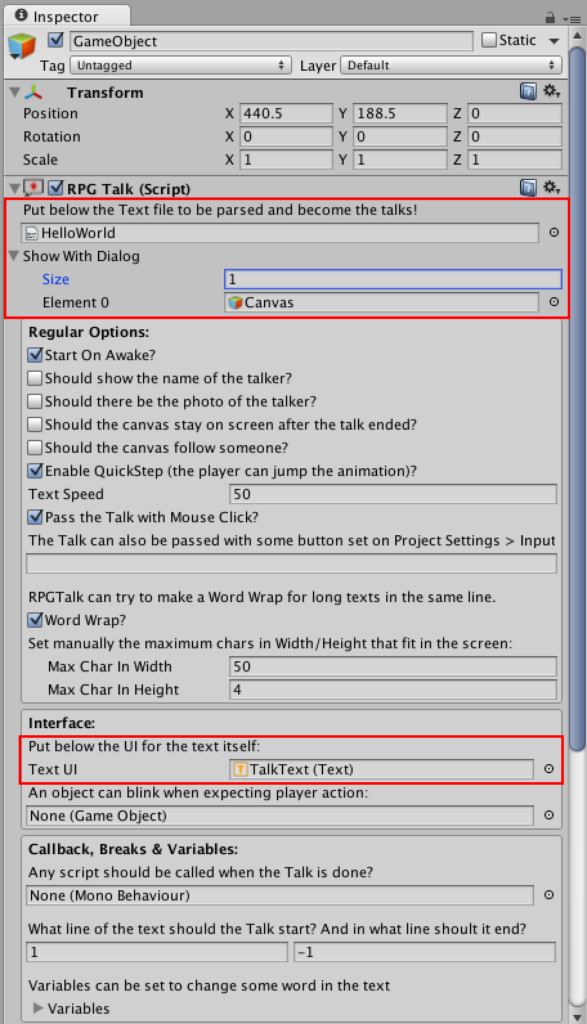
Por fim, você precisa adicionar o componente RPGTalk em qualquer objeto da cena (Add Component > Seize Studios > RPGTalk > RPGTalk). Você também pode criar um novo objeto já preparado no menu superior RPGTalk > Create RPGTalk > Base Instance. Atalho Ctrl/Cmd + Shift + R.
Logo abaixo dessa opção, existe a “Show With Dialog”. Isso é uma Array que você deve colocar qualquer elemento que deve aparecer quando o diálogo começar e desaparecer quando ele terminar. Comumente, essa Array tem pelo menos 1 objeto: o Canvas que criamos no passo 2.
Mais em baixo, dentro das opções de Interface, o RPGTalk pergunta quem é o “Text UI”. Aqui, você deve colocar o Text que criamos no passo2.
2.2.Regular Options
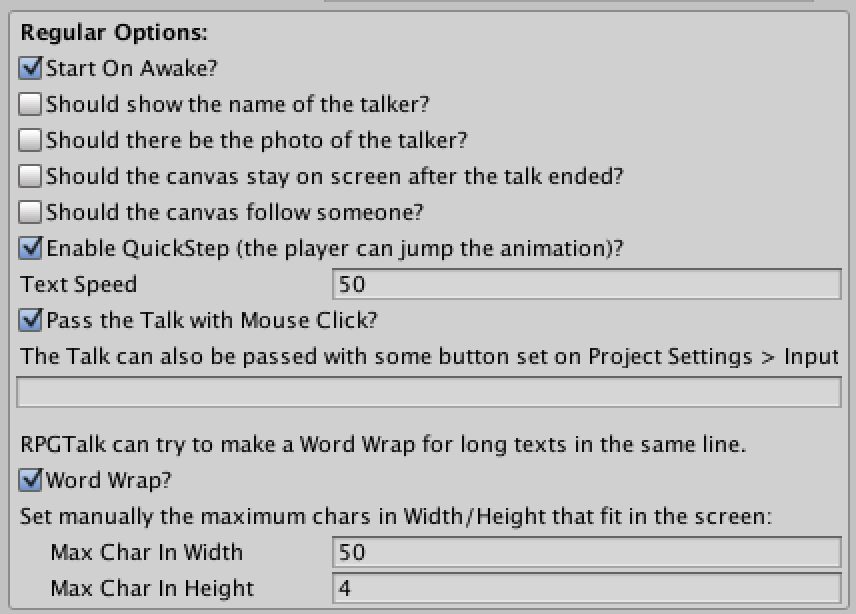
Se essa opção estiver marcada, o Diálogo inicia quando o objeto em questão chamar a função Start (geralmente, no início da cena).
Should show the name of the talker?
RPGTalk pode mostrar o nome de quem está falando. Com essa opção marcada, é liberada, nas opções de Interface, o Dialoger UI. Note que também é necessário uma alteração no texto para que o nome seja mostrado corretamente. Cada linha do Arquivo de Texto deve começar com o nome do locutor, seguindo pelo símbolo “:” e só então a fala em si. Por exemplo:NomeDoHerói: Eu vou salvar o mundo!
Essa opção libera as opções UI Photo em Interface e a Array Photos em Callback, Breaks and Variables. Veja mais em sua sessão.
Should the canvas stay on screen after the talk ended?
Se essa opção estiver marcada, todos os objetos marcados em “Show With Dialog” se mantêm na tela mesmo depois do diálogo ter terminado.
Should the Canvas follow someone?
Essa opção abre mais um conjunto delas: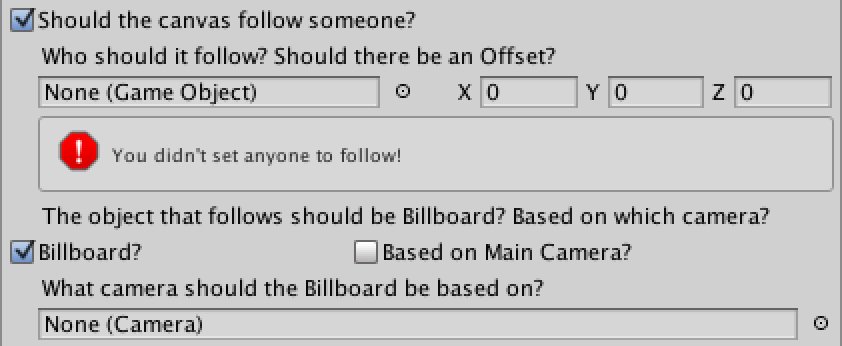
Você também escolher um offset, para esses objetos não ficarem no ponto de origem.
Se você não especificar um nome para o objeto a ser seguido, RPGTalk irá ignorar o nome do locutor e sempre seguirá o objeto colocado ali.
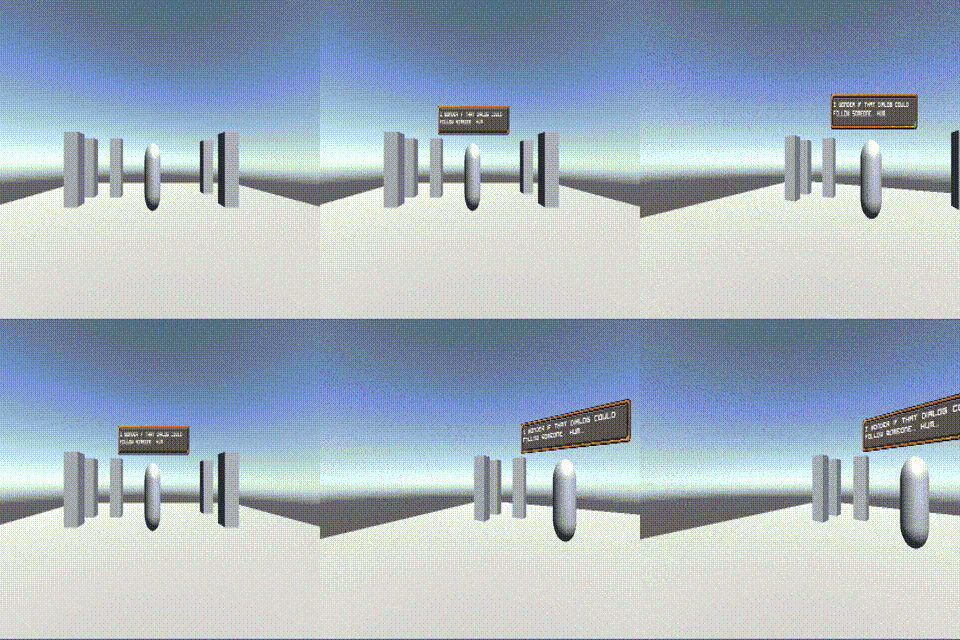
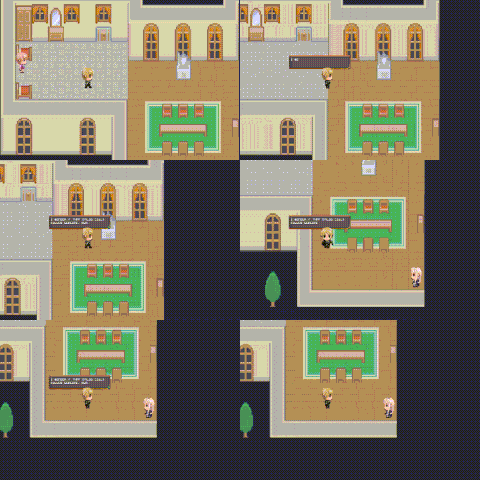
Um objeto Billboard está sempre olhando para a câmera, enquanto um não Billboard pode entrar na perspectiva dela. Observe o exemplo 3D com um RPGTalk Billbord e em seguida um sem.
Se marcada, o jogador pode pular o texto sem ter que esperar até o fim da animação.
Text Speed
A velocidade que a animação do texto deve acontecer, em caracteres por segundo. A velocidade do texto pode ser mudada durante um diálogo. Veja (Changing Text Speed).
Pass the Talk with mouse click?
Se marcada, um simples clique na tela é o bastante para passar o diálogo.
Pass with Button
Logo em baixo da opção do mouse, você pode escrever qualquer Input (setado em Project Settings > Input) que também pode ser usado para passar o diálogo. Isso é útil para ter alguma tecla, ou botão de Joystick funcionando além do mouse.
Word Wrap?
Se verdadeiro, abrirá as opções Max Char Width e Max Char Height. Você deve colocar nelas o máximo de caracteres em largura e em altura que cabem na sua caixa de diálogo. Isso vai permitir que o RPGTalk corte sozinho o texto em vários diálogos, assim você não precisa se preocupar com o tamanho de uma linha no arquivo de texto. 2.3.Characters Settings
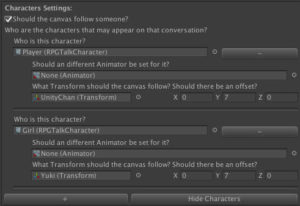 This whole option group will only be visible if you have set Should try to read the name of the talker option on the Regular Options.
Note that to actually follow someone, your RPGTalk object should also have the Follow Character snippet.
If you press the – button just beside it, the character will be removed from the list.
Useful when you want your characters on screen to animate instead of something like a photo alongside the UI.Creating a character
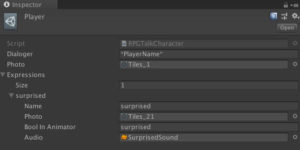 To create one, go to the Project window, Right Click and the desired folder and go Create > RPGTalk > Character.
Who is the Dialoger? What is name, as written on the TXT, that this character represents?
A Photo to be set in UIPhoto if this expression is being used.
A Bool in Animator that will be true while a line with that expression is being said.
And an Audio that will play every time this expression comes around. 2.4.Interface
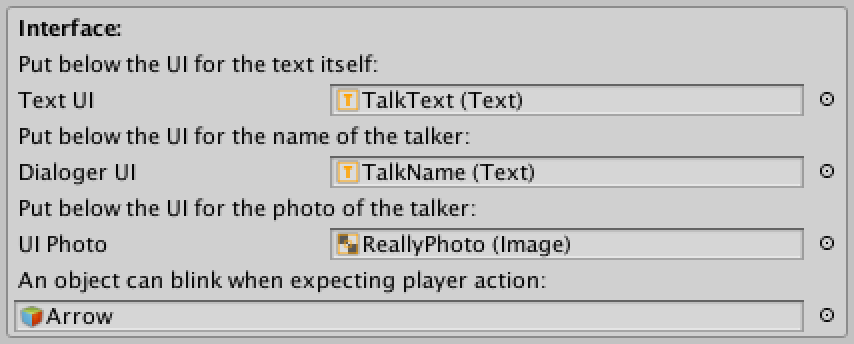 Aqui, você encontrará as opções de interface.
Dialoger UI: Esse parâmetro deve ser preenchido com o objeto do tipo Text que o RPGTalk deve escrever o nome de quem está falando aquele diálogo. Nota: esse parâmetro só estará disponível se a opção “Should show the name of the talker?” em Opções Regulares estiver marcada.
UI Photo: Esse parâmetro deve ser preenchido com o objeto do tipo Image que o RPGTalk deve alterar com a foto de quem está falando aquele diálogo. Nota: esse parâmetro só estará disponível se a opção “Should there be the photo of the talker?” em Opções Regulares estiver marcada.
Object to Blink: Você pode escolher algum objeto para piscar na tela quando o diálogo tiver chegando ao fim. Geralmente, é colocado uma seta, indicando que o jogador deve apertar alguma tecla para continuar o diálogo. O objeto pisca usando a função SetActive do GameObject. 2.5.Callback, Breaks & Variables
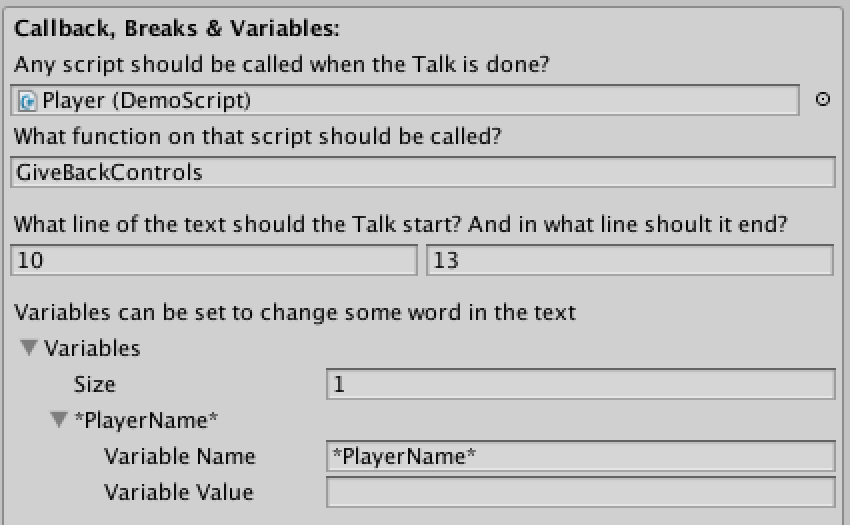
CallBack Function: escreva o nome da função para ser chamada, no Script acima, quando o diálogo acabar.
Line To Start & Line To Break: Por padrão, o valor Line To Start é 1 e Line to Break -1. Isso quer dizer que o diálogo vai começar a ler o arquivo de texto na linha 1, e só vai parar quando este chegar ao fim. Mas você pode escolher qualquer valor de início e final, possibilitando o uso de diversos diálogos no mesmo arquivo TXT.
Esses valores também podem ser uma string, um título para ser procurado no TXT ao invés de dizer o número exato da linha. Para fazer isso, uma mudança no texto é necessária:
Se você escrever cutscene1_start na variável Line To Start e cutscene1_end na Line To Break, seu texto deve parece com isso:
[title=cutscene1_start]
Essa linha será mostrada!
Essa também! Massa!
[title=cutscene1_end]
Essa não.
Variable Value: O valor que deve substituir a variável descrita no parâmetro acima. 2.6.Photos and Sprites
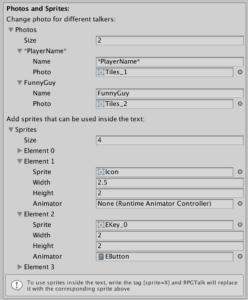 Nessa sessão você pode adicionar fotos que representam o locutor e/ou sprites para serem adicionados como UI Images dentro do texto.
Photo: Um arquivo do tipo Sprite que será a foto representando o locutor do parâmetro acima. Nota: Esse parâmetro não garante que a foto seja animada. Para isso você deve usar a sessão Animação.Well, I want to have a sprite right here [sprite=1] before these words.
Width/Height: The size that the sprite will have in characters. If you set the width and height as 1, the image will have the same size as a letter inside of your text. The size varies depending on the font and font-size parameters in the text.
Animator: if you want this sprite to be animated, you can set here a Animator that will be created with it.
2.7.Animation

Boolean Name: Escreva um parâmetro, do tipo Booleano, que exista no Animator. Esse parâmetro será verdadeiro enquanto a animação do texto estiver correndo.
Int Name: Escreva um parâmetro, do tipo Int, que exista no Animator. Esse parâmetro terá o valor de que personagem está falando, começando do zero. O número que representa cada personagem é a ordem que ele foi colocado no parâmetro Photos em Callback, Breaks & Variables. 2.8.Audio

Click Sound: Cada vez que o jogador passar um diálogo, RPGTalk pode emitir o arquivo de áudio que você colocar aqui. 2.9.Choices
 Se você quer que seu jogador tenha a habilidade de fazer escolhas no jogo, esse é o lugar para ir.
Choices Parent: Você pode colocar um objeto para ser o pai dos botões que serão instanciados quando uma questão for feita. A melhor prática é escolher um objeto com o componente “Canvas Layout Group”, para que os botões possam ser alinhados automaticamente.
NomeDoLocutor: [question=0]Então, posso te fazer uma pergunta?
[choice]Claro!
[choice]Não estou no clima...
NomeDoLocutor: Texto para ser usado como resposta...
2.10.Easily changing the text while the game is running
Você pode também colocar o componente em qualquer objeto (Add Component > Seize Studios > RPGTalk > RPGTalk Area), apenas note que ele precisa de um Collider para funcionar. Pode ser 2D ou 3D, desde que seja um Trigger.
Logo abaixo, você pode colocar um Playable Director para que essa Area ao invés (ou também) dê Play em uma Timeline.
Should wait for user’s interaction to start?
Se marcado como verdadeiro, nada vai acontecer até que o jogador interaja com essa Area. Você será questionado qual é a tecla que precisa ser apertada para que a interação comece. Também, você pode botar alguns GameObjects para serem mostrados quando a interação estiver disponível. Uma boa prática é colocar algum Canvas com o texto: “Pressione A para conversar”.
Cannot be played if the RPGTalk instance is already playing proíbe a Area de funcionar se outra conversa ainda estiver acontecendo nessa instância de RPGTalk.
Você também pode escrever uma tag abaixo para checar quem pode interagir com essa Area. Se você escrever “Player”, por exemplo, somente objetos com a tag Player podem ativar essa Area.
Um uso comum é bloquear os controles do jogador enquanto alguém está falando, e devolver quando a conversa terminar.
Logo depois, você pode escolher se o diálogo deve ou não ficar na tela quando a conversa acabar. 2.11.Dubbing
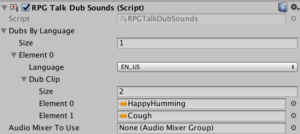
A primeira coisa que você precisa fazer é adicionar o componente RPGTalk Dub Sounds no mesmo objeto que tem a instância do RPGTalk.
Uma vez que isso foi feito, você terá uma array Dubs By Language e precisará adicionar aqui quantas linguagens você tem de dublagem.NomeDoLocutor: [dub=0] Wow! Essa linha vai tocar o primeiro som!
NomeDoLocutor: [dub=1] Yeah! E essa vai tocar o segundo!
NomeDoLocutor: Humm... Essa não vai tocar som de dublagem...
2.12.Localization
Se você configurou seu RPGTalk para começar e terminar com um número de linha, tenha certeza que todos os arquivos de texto tenham a mesma linha no mesmo número.
Se você configurou para procurar pela tag Title (veja mais em Tags) tenha certeza que você tem os títulos correspondentes em cada arquivo de texto.
Algo assim em um arquivo Cutscene1_Portugues.txt :Primeira linha no diálogo, legal!
Segunda é bom.
[title=MyTitle]
Isso é bom.
Essa linha nem existe na língua em inglês, mas tudo bem porque eu usei títulos.
[title=MyTitle_End]
First line in the talk, awesome!
Second is good.
[title=MyTitle]
This is good.
[title=MyTitle_End]
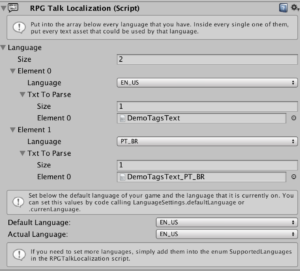
Uma vez que o componente está pronto, você só precisa adicionar na array o número de línguas que seu jogo irá suportar.
Para cada elemento criado, novas opções são reveladas:
Txt To Parse: Outra array onde você deve colocar todos os arquivos de texto daquela língua.LanguageSettings.actualLanguage
using UnityEngine;
using RPGTALK.Localization;


public class MyClass : MonoBehaviour{
void Start(){
LanguageSettings.actualLanguage = SupportedLanguages.PT_BR;
}
}
public enum SupportedLanguages{
EN_US,ES,FR,PT_BR,EZ_CN
}
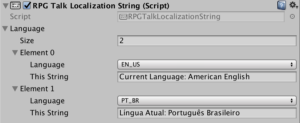
This String: Uma string simples que substituirá o texto quando seu jogo estiver naquela língua. 2.13.Integrating with Timeline
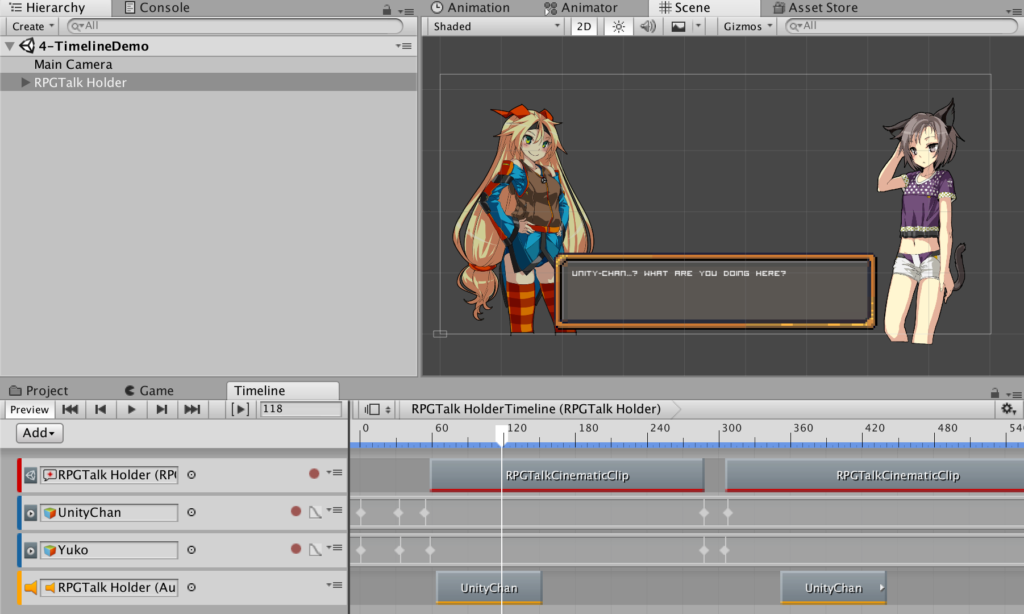

Você pode colocar um novo arquivo de texto para ser usado pela instância do RPGTalk que colocou na track e escolher uma linha para começar lendo. Também pode escolher a velocidade do texto. A tag [speed=x] (veja mais em Tags) não vai funcionar dentro de cinematic clips.
Se for, você pode escolher a linha para começar e terminar como normalmente faria.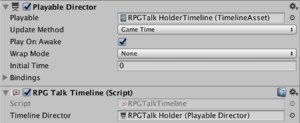 Isso é possível porque RPGTalk vai pausar a Timeline sem perder o que estava tocando dentro dela e esperar o diálogo acabar para despausá-la. Para fazer isso, você precisa ter o componente RPGTalk Timeline (Add Component > RPGTalk > RPGTalk Timeline) no mesmo objeto que está sua instância do RPGTalk.
A única opção aqui é quem é o Playable Director que está tocando aquela timeline.
Mas cuidado!
Tome cautela com o tamanho do clip quando estiver esperando por uma ação do player. Se o texto terminar antes do final do clip, tem uma chance do player terminar o diálogo antes da timeline sequer pausar, e aí o RPGTalk Timeline não vai conseguir despausar automaticamente (Você ainda pode Pausar ou Despausar qualquer timeline usando os Métodos dele). 2.14.Tags
Exemplo para ser colocado no arquivo de texto:
Eu posso usar <b>negrito</b>, <i>itálico</i>, mudar minha <color=00ffff>cor ou meu <size=30>tamanho
Exemplo para ser colocado no arquivo de texto:Essa linha terá um sprite [sprite=0] aqui e outro [sprite=1] aqui.
Exemplo para ser colocado no arquivo de texto:Eu vou agora lhe contar o maior [speed=10]plot twist[/speed] da história. Você está [speed=5]chocado[/speed] agora?
Exemplo para ser colocado no arquivo de texto:[title=MyTitle]
This line will be read!
This will too!
[title=MyTitleEnd]
This wont =(
Se você mostra o nome do locutor no seu RPGTalk, a tag dub deve vir depois do nome.
Exemplo para ser colocado no arquivo de texto:NomeDoLocutor: [dub=0] Som é legal!
NomeDoLocutor: [dub=1] Som é ótimo!
[dub=2]E se som fosse um de nós?
Mas não é, tudo que você precisa fazer é escrever /n no seu texto e ele irá quebrar uma linha.Isso ficará em uma linha. \n Isso em outra! \n Mas continua um único diálogo no RPGTalk.
3.Programming Reference
3.1.Variables
	/// Should the talk be initiated when the script starts?


	public bool startOnAwake = true;


	/// An array of objects that will be shown or hidden with the text.Usually, the canvas with the text UI is set here.


	public GameObject[] showWithDialog;


	/// The UI element that holds a Text component


	public Text textUI;


	/// This dialog have the name of the talker? The dialoger?

	public bool dialoger;


	/// To show the name of the talker, another UI that holds a Text component is required


	public Text dialogerUI;


	/// Should the element follow someone?


	public bool shouldFollow;


	/// Who to follow? There can be more than one to follow, based on the name of the talker


	public RPGTalkFollow[] follow;


	/// The objects in showWithDialog should be Billboard?


	public bool billboard = true;


	/// If billboard is set to true, should it be based on the main camera?


	public bool mainCamera = true;


	/// If billboard is set to true but not the mainCamera, should it be based on what camera?


	public Camera otherCamera;


	/// The text file that contains all the talks to be parsed.


	public TextAsset txtToParse;


	/// If the player hits the interaction button, should the text be skipped to the end?


	public bool enableQuickSkip = true;


	/// Some script to look for a feedback when the talk is finished. Leave blank if no feedback is needed


	public MonoBehaviour callbackScript;


	/// Function to be called when the talk finishes. Will only work if some script is set into callbackScript.


	public string callbackFunction;


	/// An animator that some parameters can be set by RPGTalk to help animating while the talk is running


	public Animator animatorWhenTalking;


	/// Name of a boolean property in the animatorWhenTalking that will be set to true when the text is running.

	public string animatorBooleanName;


	/// Name of an int property in animator that represents the talker (based on the photos array).


	public string animatorIntName;


	/// Wich position of the talk are we?


	public int cutscenePosition = 0;


	/// Speed of the text, in characters per second


	public float textSpeed = 50.0f;


	/// wich character of the current line are we?


	public float currentChar = 0.0f;


	/// a list with every element of the Talk. Each element is a line on the text


	public List rpgtalkElements;


	/// A GameObject to blink when expecting player's intercation. It will blink by alternating the GameObject Active property.


	public GameObject blinkWhenReady;


	/// An array that can contain any variable and what is its value to be replaced in the talk


	public RPGTalkVariable[] variables;


	/// Should there be photos of the dialogers?


	public bool shouldUsePhotos;


	/// The photos and who they belong to.


	public RPGTalkPhoto[] photos;


	/// An UI element with the Image property that the photo should be applied to


	public Image UIPhoto;


	/// The dialog and everything in showWithDialog should stay on screen even if the text has ended?


	public bool shouldStayOnScreen;


	/// Audio to be played while the character is talking


	public AudioClip textAudio;


	/// Audio to be played when player passes the Talk


	public AudioClip passAudio;


	/// Pass the text with mouse Click?


	public bool passWithMouse = true;


	/// Pass the text with some button set on Project Settings > Input


	public string passWithInputButton;


	/// The user can currently pass the talk?


	public bool enablePass = true;


	/// Line to start reading the text. Should not be below 1.
	/// Can be a string that the RPGTalk will look for in the text by the pattern [title=MyString]


	public string lineToStart = "1";


	/// Line to stop reading the text. If it is -1 it will read until the end of the file.
	/// Can be a string that the RPGTalk will look for in the text by the pattern [title=MyString]


	public string lineToBreak = "-1";


	/// Should the RPGTalk try to break long lines into several little ones?


	public bool wordWrap = true;


	/// If wordWrap is set to true, RPGTalk will only accept a line with maxCharInWidth * maxCharInHeight characters.
 If the line in the text passes it, it will be broken into another line.


	public int maxCharInWidth = 50;


	/// If wordWrap is set to true, RPGTalk will only accept a line with maxCharInWidth * maxCharInHeight characters.
 If the line in the text passes it, it will be broken into another line.


	public int maxCharInHeight = 4;


	/// The sprites that can be used in this talk


	public List sprites;


	/// The sprites that are being used in this talk


	public List spritesUsed;


	/// The actual speed that the text will be scrolled. This usually is equal to textSpeed
but can be changed within the text with the [speed=X] tag


	public float actualTextSpeed;


	/// Is the RPGTalk currently playing the text?


	public bool isPlaying;


	/// The prefab of a Button that will be the choice in case of questions in the text


	public GameObject choicePrefab;


	/// A parent that each choice will be instantiated to in case of questions


	public Transform choicesParent;
3.2.Methods
Starts a new talk with every option in the variables. You can this method from several different ways so you can easily change how the new talk will be.
The following code, for instance, starts a new talk in a RPGTalk instance set as “rpgtalk” to start from the line 10 and end in the 12.
rpgtalk.NewTalk("10","12");
string _lineToBreak
TextAsset _txtToParse
MonoBehaviour _callbackScript
string _callbackFunction
Plays the next line in the talk. If there are no lines left, it ends the talk.
The only parameter is:
Ends the current talk. The callback functions will still going to be called.
The only parameter is: 3.3.Events
Called when a new Talk Starts
Called when the user passes a dialog
Called when the user finishes a talk
Called when the users answers a question (see more in Choices). This event has two parameters: the ID of the question and the ID of the answer, so you can do whatever you want with that information.
int questionID, int choiceNumber
public Rpgtalk rpgtalk;
void Start(){
rpgtalk.OnMadeChoice += OnMadeChoice;
}
Debug.Log(“Aha! In the question “+questionID+” you choosed the option “+choiceID);
} 3.4.RPGTalkDubSounds
public AudioMixerGroup audioMixerToUse; 3.5.RPGTalkLocalization
3.6.RPGTalkTimeline
4.Snippets
But we like to make your life easier 😉
So we already made a bunch of stuff using RPGTalk’s API. Check it out 4.1.Follow Character
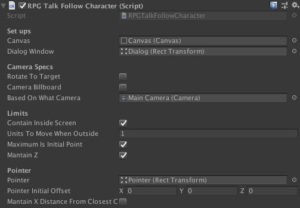
Canvas: Throw your canvas here! The comportment of the snippet changes if your canvas is ScreenSpace.
DialogWindow: This is the object that the snippet will indeed move. Inside a canvas.
RotateToTarget: If set, the DialogWindow will have the same rotation as the character.
CameraBillboard: If set, the DialogWindow will always be rotate to the camera.
BasedOnWhatCamera: On what camera the Billboard or the ScreenSpace will be based on

A Billboard object is always looking for the camera, while a non-Billboard one can fit into its perspective. Check the 3D exemple here with a RPGTalk Billboard and other without.
ContainInsideScreen: If set, the Dialog Window will never leave the screen, even if the character moves out of it.
UnitsToMoveWhenOutside: how units should be moved when the character is outside?
MaximumIsInitialPoint: If set, the dialog Window will only try to be contained until its corners hit the initial point. After that, it will move out of the window as it should before.
MaintainZ: ScreenSpace objects may have problems with Z. If this option is checked, the Z won’t be changed.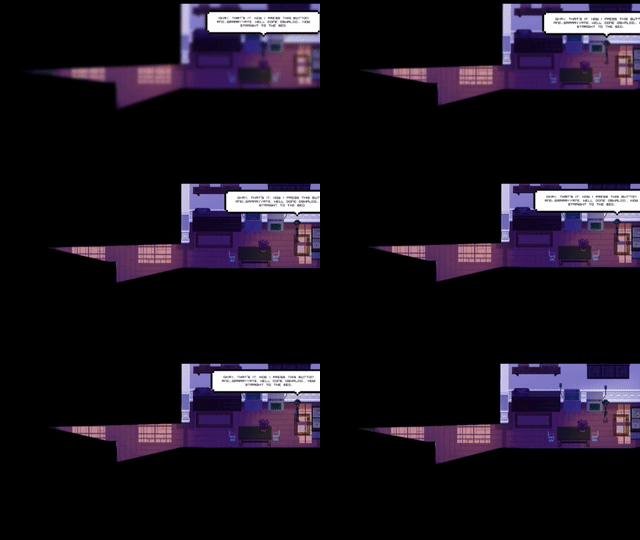
Pointer: A pointer can be set to be teleported to the lowest Y of the Dialog Window. If the pointer is a Smart Pointer, the Snippet also set its end point.
PointerInitialOffset: any offset of the pointer?
MantainXDinstanceFromClosestCorner: If set, the X distance that you have set of the closest corner on Dialog Window will be kept. Useful for when you want a left or right pointer. 4.2.Can Pass Warning
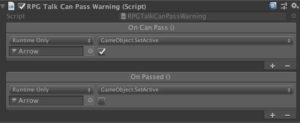 Maybe you want something to happen when the user can pass the talk.
Maybe an arrow that shows up indicating that a player action is needed? 4.3.Save Instance
If not set, everything saved will be erased when the game closes.
For programmers: it saves data using PlayerPrefs. Feel free to change the script and use your favorite save method. 4.4.Simple Animation
4.5.Skip Cutscene
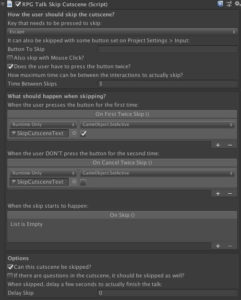 This Snippet should be used in the same object that has the RPGTalk Timeline component.
The new option here is the one that asks if The user have to press the button twice. This is used a lot in big games to display a message like “Press X again to skip the cutscene”.
If this option is set, you will have to say how many seconds before the warning goes out and what events should happen when we hit the first time and don’t hit again.
A simple bool that can block skip.
An option that jumps questions on the cutscene. If not set, your cutscene will be skipped until an option is found.
In the end, you may set a delay when the user skips it. Useful for if you want to make a fade out or something like that. 4.6.Smart Pointer
5.BETA - Node Editor
It is not complete. It has some known bugs and a lot os space to grow. But it is just so awesome that we couldn’t keep it to ourselves!
A dialog node will appear where you can set the Title, the Character that is talking (automatically gathered from every Character on the project), and the dialog line.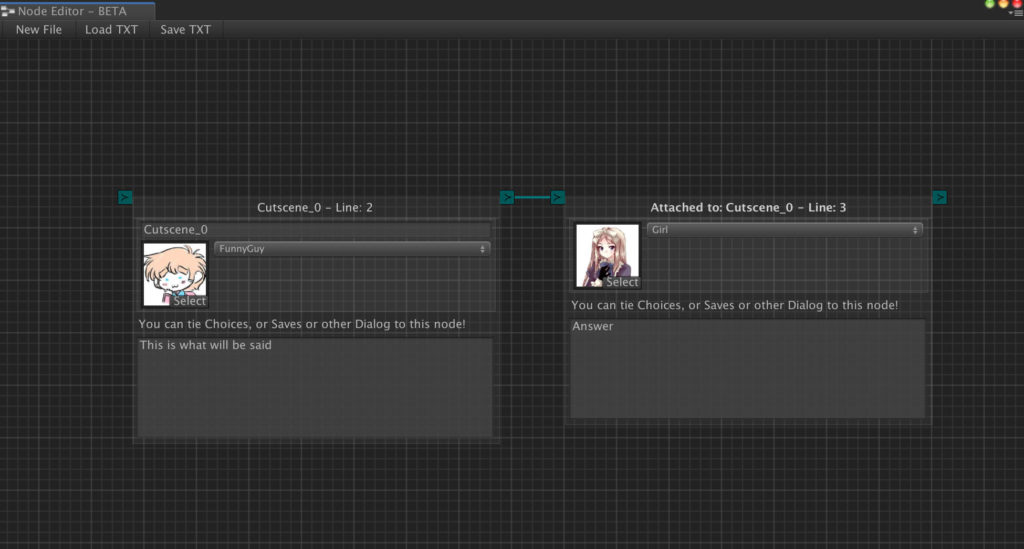
You can connect how many choice nodes you want to a Dialog Node that will be the question.
After that, you can connect the choice nodes to a new Dialog Node that will be the follow up conversation if the player has chose this answer.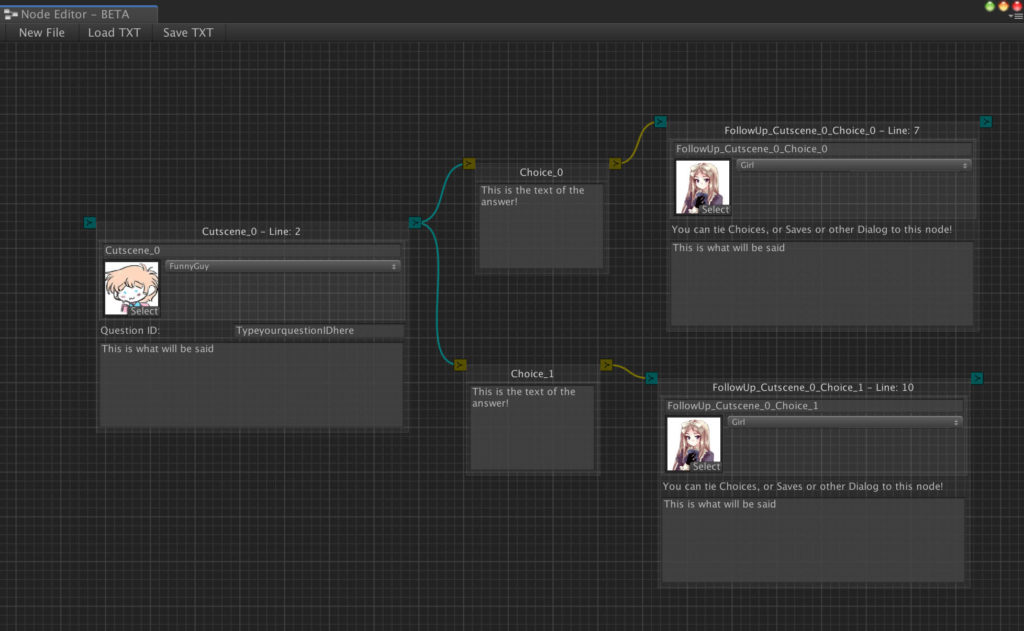

You can then use the generated TXT in your RPGTalk components! Nice!
You can also load TXT to edit then as nodes.

